Bulk download of linked documents from SIMS has historically been a time consuming task performed by opening individual documents from the Student record. RLeX greatly simplifies the process while maintaining document security. Users can only eXport documents according to their SIMS permissions.
RLeX licences are provided on an annual basis per school with unlimited users for each school. The software is downloaded from this site and installed on client PCs. The same licence key is entered during each installation to activate the software and all seats will expire on the same date. The expiry date is set at 375 days after the key is generated. This allows ten days for installation and 365 days of use. We have found this to be the simplest method to give schools flexibility in using their licences.
All licences are subject to our Terms and Conditions and you will be required to accept this End User Licence Agreement during installation.
We have found no technical issues arising from RLeX but expectations should be realistic;
RecordLink Writer integrates documents from MS Word, Outlook and Excel with the SIMS Document Server and Communications Log.
It appears as a toolbar in MS Office with three buttons reading “Open from SIMS”, “Save to IMS”, and “Save to SIMS As”. Using the “Save to SIMS As” button in RecordLink Writer saves the file you are working on direct to the SIMS document server and links it to the chosen student record to give the same result as logging in to SIMS, browsing to a student record, adding a linked document and browsing back to a document that is to be attached. The end user can save the same document to one or multiple student records including year and tutor groups, academic classes and user defined groups. If the database entry such as the particular Achievement, Medical Condition or Communication is not present in the student record the user can create it for one student or a list of students. Using “Open from SIMS” the user can browse the Student record according to their permissions and open documents. Changes to documents already in SIMS are saved using “Save to SIMS”.
Versions 1.8.0.2 and onwards include the new Split&Save function which enables users to split SIMS mail merge documents and save only the relevant pages to the records of individual students.
FOR FULL DETAILED INSTRUCTIONS CLICK HERE
RecordLink Writer consists of two elements. First, RecordLink Manager which is installed on the SIMS Server. This element must be registered on-line with your Product Key, after which it governs the availability of licences to the second element, RecordLink Writer. This is installed on end-user PCs that are networked to the same SIMS server. RecordLink Writer is the functional software that allows the end users to integrate MS Office with SIMS.
RecordLink Writer works with documents on the SIMS Document Management Server and does not open them locally. Therefore if you browse to a document using SIMS and open the document locally (using ‘View’ rather than ‘Open’) RecordLink Writer will not recognise the link with SIMS and ‘Save to SIMS’ will not be enabled for any changes to that document. Use RecordLink Writer to open the documents. This will remove the need to upload any documents at a later date.
RecordLink 4pdf integrates eCopy PDF Pro Office with the SIMS Document Server and Communications Log, saving Linked Documents and Communications.
eCopy PDF Pro Office (EPPO) is a PDF handling package akin to Adobe Reader, with further editing and document handling capabilities. It installs with a PDF print driver so that any printable file can be printed to EPPO as a PDF and saved to SIMS. EPPO is available through RecordLink - and you can download a 45 day trial here.
RecordLink 4pdf appears as a toolbar in EPPO with three buttons reading “Open from SIMS”, “Save to SIMS”, and “Save to SIMS As”. Using the “Save to SIMS As” button in RecordLink 4pdf saves the file you are working on direct to the SIMS document server and links it to the chosen student record to give the same result as logging in to SIMS, browsing to a student record, adding a linked document and browsing back to a document that is to be attached. The end user can save the same document to one or multiple student records including year and tutor groups, academic classes and user defined groups. If the database entry such as the particular Achievement, Medical Condition or Communication is not present in the student record the user can create it for one student or a list of students. Using “Open from SIMS” the user can browse the Student record according to their permissions and open documents. Changes to documents already in SIMS are saved using “Save to SIMS”.
|
Absolutely.
The Split&Save function enables users to break down a SIMS mail merge document into its constituent sections and then save only the relevant section to each student's record.
This process relies on the insertion of the correct fields in the mail merge document detailed in the section below named Using the Split&Save function to save a mail merge to SIMS.
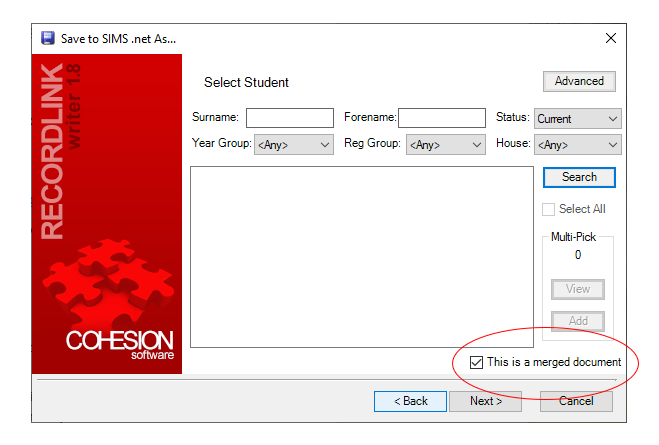
In brief, during the construction of the mail merge template, simply insert the Person_id field in the required format. Once the mail merge has been compiled just open RecordLink writer, follow the wizard and tick "This is a merged Document". RecordLink writer will then disassemble the document and save the relevant section to the relevant student record as a new Word file.
Other RecordLink writer functions such as creating a new database entry are accessible during the process.
Look in Add-Ins on the toolbar of Word, Outlook and Excel.
In the Outlook shell this is the only place you will find the toolbar and the only option will be "Open from SIMS".
Once an individual email is opened in its own window ('Pop Out' in latest Office) the the option to "Save To SIMS" will appear in Add-Ins.
We provide remote support via telephone and screen sharing to our direct customers. Resellers provide end user support that is explained in the purchase process. We provide second level support to resellers. In addition FAQs are updated here as necessary.
Not much is the answer - there is no change to the functionality of RecordLink writer in Office 365 ProPlus and you'll not even need to reinstall it. However ProPlus is a little different to standard 365 and it's possible that some Add-Ins may need to be re-enabled.
The fix is straight forward.
In Outlook shell select File/Options then select Add-Ins near the bottom of the left hand menu.
Find the Manage option at the bottom of the window and select Disabled Items from the drop down menu followed by Go. In the new pop-up window highlight RecordLink writer by clicking on the entry then select Enable. Close the window and hit OK in the Options window to close that. Check RecordLink writer now appears in Add-Ins in Outlook shell.
If Add-Ins are defaulted to the disabled status it is also likely that you will need increased local admin permissions to enable them. This is a local setting that will require changing by your IT support.
IMPORTANT: If you open SIMS and browse to a document and then open the document with the Open option in SIMS then RecordLink Writer will not recognise the SIMS link to the document you have opened. Save to SIMS will not be enabled. For full RecordLink Writer functionality open the document using RecordLink Writer.
When running an export you first need to select which students are included before choosing the Linked Documents attached to those students. Linked Documents can be exported from student or staff records and to do this RecordLink eXport operates in two modes.
For hosted environments we strongly recommend running a trial in order to check compatibility.
Technical isssues such as firewall settings are dealt with below in RecordLink Writer installation and support.
This is our most regular support call and is easy to fix.
The RecordLink writer version needs to match the architecture of MS Office, not the OS. The usual situation we see is 64-bit RLw client (not) running with 32-bit Office on a 64-bit OS.
First check the MS Office version, go to Outlook/File/Office Account. You should see the Office version listed or it may be behind the About Outlook icon. Find if you are using 32 or 64 bit and then check the RLw client end. If it’s the wrong flavour just uninstall the incorrect version, download the correct one and run the installer.
If this fails to restore the Add-Ins then it is possible that they are defaulted to the Disabled status.
For Office 2016, in Outlook shell select File/Options then select Add-Ins near the bottom of the left hand menu.
Find the Manage option at the bottom of the window and select Disabled Items from the drop down menu followed by Go. In the new pop-up window highlight RecordLink writer by clicking on the entry then select Enable. Close the window and hit OK in the Options window to close that. Check RecordLink writer now appears in Add-Ins in Outlook shell.
If Add-Ins are defaulted to the disabled status it is also likely that you will need increased local admin permissions to enable them. This is a local setting that will require changing by your IT support.
|
From eCopy PDF Pro Office select “Open from SIMS ” and log-in as prompted, selecting “Remember Me” if required for seamless future use. You can then browse the focus areas of SIMS according to your permissions and open documents from the Student, Staff, Contact, Agent, or Pre-Admissions areas. In the student focus area you can browse the student record according to Achievement, Medical Event etc. Once a student has been selected you will see a photograph of the student if available. If the file is not in pdf format it will open in the default application. IMPORTANT: If you open SIMS and browse to a document and then open the document with the Open option in SIMS then RecordLink 4pdf will not recognise the SIMS link to the document you have opened. Save to SIMS will not be enabled. For full Connector functionality open the document using RecxordLink 4pdf in the PDF Pro Office toolbar. |
| The "Save to SIMS" option is enabled when a document has been opened from SIMS or saved during the current session. Clicking on "Save to SIMS" and following the prompts will save further changes to SIMS. If you do not alter the Notes and Summmary fields and have adequate permissions you may overwrite the previous version. You will be prompted in this case. If you do not wish to overwrite the original alter the Notes field or save the file in a different location using "Save to SIMS As". |
RecordLink Writer and the licence server are upgraded in parallel with changes to SIMS. We also release new versions from time to time to enhance the functionality. When updated versions are released our registered users receive an email and we post on the blog here. RecordLink Writer is upgraded on average every six to twelve months. If the new version includes an element that has been required to be upgraded in line with changes to SIMS then you will need to uninstall RecordLink Writer from the end user terminals and replace with the up to date version at the same time as the SIMS upgrade. You can do this individually or via group policy. At any time you can download the latest version and install it free of charge. If the updated version only includes functional enhancement then you may choose to upgrade or not. There is no charge for upgrades during your annual subscription.
There is no need to make any changes to the manager other than to check you have the latest version.
| The “Save to SIMS ” option is enabled when a document has been opened from SIMS or saved during the current session. Clicking on “Save to SIMS ” and following the prompts will save further changes to SIMS . If you do not alter the Notes and Summary fields and have adequate permissions you may overwrite the previous version. You will be prompted in this case. If you do not wish to overwrite the original alter the Notes field or save the file in a different location using “Save to SIMS As”. |
“Save to SIMS” provides a rapid save of the current version back to the same location and allows an overwrite of the previous version if required and if permissions allow. The “Save to SIMS” command is therefore only enabled when the current file has live links to SIMS. RecordLink Writer therefore requires that the current document either be opened from SIMS using RecordLink Writer or saved with “Save to SIMS As” before “Save to SIMS” is available to use.
The core elements of RecordLink Writer have been operating since August 2006 in the SIMS Connectors for eCopy. The wrapper for MS Office products has been in use since January 2008. The technical resource for RecordLink Writer is provided by Cyclone Industries, a Capita Technical Partner since 2005. Both Cyclone Industries and RecordLink Ltd work closely with schools and Capita to ensure the stability and increasing utility of the software. Our incedent rate is approximtely one incedent per 80 software licence years. Most technical incedents relate to installation support, such as the connect.ini file being incorrect. No RecordLink products have been reported as associated with data loss or ongoing unresolved issues.
As with any of the applications use Add and Remove Programs to remove the old version then just run the new MSI available on the download page.
REMEMBER: Take a note of the Product Key and Activation Key from the manager before you remove it. You will need these for the new version and then wont have to request a reset.
If your hardware ID changes we will need to reset the Product Key. You can then download a new Activation Key. If you are changing hardware ID and need a reset, email licences@cohesionsoftware.co.uk with your School, LA/DCSF, and Product Key, ask for a reset and we will do it for you.
In some circumstances you may wish to move or replace the SIMS server. As RecordLink Manager needs to be on this server you will need to install the latest version from our download page onto the new SIMS server and go through the activation process. The server change will cause a change in the hardware ID of the manager so you will also need to go through the activation process once more. Please notify us as above and we will reset your Product Key ready for this. Optionally you may help yourself to a ten day trial key from the RecordLink Writer product page while we do this.
| “Save to SIMS ” provides a rapid save of the current version back to the same location and allows an overwrite of the previous version if required and if permissions allow. The “Save to SIMS ” command is therefore only enabled when the current file has live links to SIMS . RecordLink 4pdf therefore requires that the current document either be opened from SIMS using RecordLink 4pdf or saved with “Save to SIMS As” before “Save to SIMS ” is available to use. |
|
“Save to SIMS As” is where the major functions of RECORDLINKwriter lie. Much of the workflow mirrors that of linking a document in SIMS so many elements, such as searching for a student, mirror the commands in SIMS. On the RecordLink Writer toolbar click “Save to SIMS As” and follow the prompts. Once a student has been selected the user can then browse to the correct area of the student record. Select the sub-area of General, Medical Notes etc and hit “Next”. In General and Medical Notes you will then be taken to the final screen and be prompted to chose the document type, given an option of “Read Only”, and asked to add Notes and optionally, Summary information. In other sub-areas where the data is organised as database entries such as Medical Conditions, you will find another layer of navigation. You will be asked to select the relevant entry before proceeding to the final screen. |
In the August 2007 Release of SIMS Trusted Logon was introduced as a new method for authentication. RecordLink uses this same logon method.
On the RecordLink 4pdf toolbar click “Save to SIMS As” and follow the prompts. Once a student has been selected the user can then browse to the correct area of the student record. Select the sub-area of General, Medical Notes etc and hit “Next”. In General and Medical Notes you will then be taken to the final screen and be prompted to chose the document type, given an option of Public, Private or Confidential, and asked to add Notes and optionally, Summary information. In other sub-areas where the data is organised as database entries such as Medical Conditions, you will find another layer of navigation. You will be asked to select the relevant entry before proceeding to the final screen.
You can purchase annual unlimited seat site licences direct from us or from our resellers. If you would like to be contacted to discuss your requirements or for a formal quote please contact us. We require a Purchase Order from the school domain email address before delivery of your licence by email and instructions. Once you have received your Product Key, from the Download tab download the licence manager and install on the SIMS server. Download the latest version of RecordLink writer and install on your choice of end user terminals either individually or using group policy. More detailed instructions will be found with your licence and below in How do I install RecordLink Writer?
| Follow the instructions for How do I save a new file to SIMS? until you arrive at “Select Student Sub-Area” then select the Sub-Area you require. At this point you will have the option to create a new entry if the required entry is absent (such entries are not used in General and Medical Notes). Hit “Create” and fill in the required fields as in SIMS. Having created a new entry and been returned to the list of all entries for that student you can again create further entries or select an entry and proceed to the final save screen. To create an entry for multiple students see How do I create multiple database entries? |
|
Using “Save to SIMS As”, you can choose to save to multiple student records and the first process is compile the list of students. Follow the prompts to the “Select student” screen and use predefined lists under “Advanced” or create your own bespoke list using “Search”. 1. To browse lists of Academic Classes or User Defined Groups select “Advanced” and pick the appropriate group and “OK”, then use “Select All” to add the names to the Multi Pick list. You can edit the returned list by selecting “View” under “Multi Pick”. 2. Instead of using predefined lists you can also create a bespoke list. Search by surname, year group etc using the text boxes and drop down lists before hitting “Search”. To add multiple students to your Multi Pick list, select the students and hit “Add”. You may then conduct a new search, e.g. by a different year group, and add some or all of the students to the Multi Pick List. You can edit this list at any time using “View”. |
RLw licences are provided on an annual basis, per school with unlimited users for each school.
The software is not transferable and will cease to work in any way at the end of the licence period.
All licences are subject to our Terms and Conditions and you will be required to accept this End User Licence Agreement during installation.
No problem here, if you get this message then your SIMS client is likely not updated.
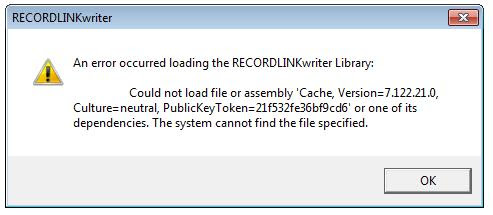
If you’ve had a recent upgrade which hasn’t updated all the DLLs (they all need to be the same version as they’re tightly bound) then check the Cache.dll on the client PC and you’ll probably find it isn’t the same version as the others.
Unless you’re solus 3 (in which case you could try re-deploying the update) you could try running the SIMSApplicationSetup.exe again. Does SIMS itself run OK? I’d suspect not.
If the above fails to fix it then take a look at the SIMS.ini on the affected device(s).
The key line is:
SIMSDotNetDirectory=
That's invalid - it needs to have the path to the SIMS folder. We use it so we know where to look for the assemblies. The sims.ini should always contain that entry and it should point to the installation folder which is where the SIMS assemblies (among other things) are located.
Here's the SIMS.ini on my laptop by way of example;
[Setup]
SIMSDirectory=C:\SIMS
SIMSSetupsDirectory=C:\SIMS\Setups
SIMSDotNetDirectory=C:\Program Files (x86)\SIMS\SIMS .net
Folder=SIMS Applications
SIMSSQLAppsDirectory=C:\Program Files\Microsoft SQL Server\MSSQL11.SIMSSQL\MSSQL\Binn
[LastChecked]
SIMSInfrastructureSetup=1.617.1.0
[InstallationLogs]
SIMSApplicationSetup.exe=C:\Users\TIMHAM~1\AppData\Local\Temp\SIMSApplicationSetup.log
SIMSSQLApplicationSetup.exe=C:\Users\TIMHAM~1\AppData\Local\Temp\SIMSSQLApplicationSetup.log
|
Using “Save to SIMS As”, you can choose to save to multiple student records and the first process is compile the list of students. Follow the prompts to the “Select student” screen and use predefined lists under “Advanced” or create your own bespoke list using “Search”. 1. To browse lists of Academic Classes or User Defined Groups select “Advanced” and pick the appropriate group and “OK”, then use “Select All” to add the names to the Multi Pick list. You can edit the returned list by selecting “View” under “Multi Pick”. 2. Instead of using predefined lists you can also create a bespoke list. Search by surname, year group etc using the text boxes and drop down lists before hitting “Search”. To add multiple students to your Multi Pick list, select the students and hit “Add”. You may then conduct a new search, e.g. by a different year group, and add some or all of the students to the Multi Pick List. You can edit this list at any time using “View”. |
First compile the list of multiple students (see I want to save the same document to several student records. How do I choose the students?), then follow the prompts to choose the Student Sub-Area. In General and Medical Notes you will be taken directly to the final save screen as database entries are not used in these areas.
In all other areas except SEN you should first choose or create a database entry against which the file will be saved. SEN is handled on a per student basis so creation of multiple entries is not available although you can still create a new database entry for single Student Records.
RecordLink Writer caters for the situation where you may know that the correct database entry exists for at least one student. If you know this to be the case select the first student and pick the known database entry (e.g. a Medical Condition or Achievement). Otherwise browse the list by picking other students and checking the entries. At any time you can proceed and select an existing entry for the first student or hit “Create” and fill in the required fields as in SIMS. Having created an entry and been returned to the list of entries for that student you can create further entries or select an entry and proceed to the next student. The chosen entry, whether selected or created is copied and the copy is temporarily saved.
For subsequent students you can then use the “Auto-Create” option and “Next” to copy the saved database entry to the new student and proceed to the next student. Alternatively, to create a different entry use “Create” once again and fill in the fields as required. NB you can create several entries for each student before choosing one and proceeding with “Next”.
You can then process the list, student by student, selecting or creating entries as required. To process all remaining students in Achievement and Behaviour select “Apply to All” to save the document and create the required database entry in SIMS and apply it to every student in the list at one click of the mouse. It is not practical to use “Apply to All” for Exclusions, Medical Conditions and Medical Events due to the frequent occurrence of overlapping or incompatible entries. You can still use “Auto-Create” and should apply this to each student in turn by selecting “Next”.
To skip a student, select “Skip Student”. To skip all remaining students and go straight to the final screen select “Skip Student” and “Apply to All Students”.
This may all seem rather complicated, in reality each step takes seconds. So should you need to send a letter to thirty Contacts informing them that their child has been made a prefect, you can save the template letter direct from MS Word via RecordLink Writer and create the Achievement of Prefect in SIMS simultaneously for all thirty student records. We estimate this to be a saving of approximately three minutes per student for each multiple save.RecordLink writer requires MS Office components and SIMS client running locally. OWA is not supprted.
For one reason or another the RECORDLINK manager service may stop working on SIMS server.
When loading Word, Outlook or Excel on RecordLink Writer client PCs you will receive the message;
Unknown error obtaining licence from SIMS server IP address RECORDLINKwriter will be disabled.
Restart the service on the SIMS server in Control Panel\Administrative Tools\Services and change the action on failure to restart.
Be sure to set the action on failure to restart in all three instances as detailed in the installation guide.
If this fails then check the latest version of the manager is installed.
Check out any firewall issues and finally check for multiple IP addresses. We have seen a user with two network cards in the server, the second one had a funky IP address on it (which was a surprise as the network manager was aware of only one). The RLmanager service was using this to listen for licence requests. Set which IP address to listen on in RLmanager config and disable the second network card. The RLw clients now successfully obtain licences.
First compile the list of multiple students (see I want to save the same document to several student records. How do I choose the students?), then follow the prompts to choose the Student Sub-Area. In General and Medical Notes you will be taken directly to the final save screen as database entries are not used in these areas.
In all other areas except SEN you should first choose or create a database entry against which the file will be saved. SEN is handled on a per student basis so creation of multiple entries is not available although you can still create a new database entry for single Student Records.
RecordLink 4pdf caters for the situation where you may know that the correct database entry exists for at least one student. If you know this to be the case select the first student and pick the known database entry (e.g. a Medical Condition or Exclusion). Otherwise browse the list by picking other students and checking the entries. At any time you can proceed and select an existing entry for the first student or hit “Create” and fill in the required fields as in SIMS. Having created an entry and been returned to the list of entries for that student you can create further entries or select an entry and proceed to the next student. The chosen entry, whether selected or created is copied and the copy is temporarily saved.
For subsequent students you can then use the “Auto-Create” option and “Next” to copy the saved database entry to the new student and proceed to the next student. Alternatively, to create a different entry use “Create” once again and fill in the fields as required. NB you can create several entries for each student before choosing one and proceeding with “Next”.
You can then process the list, student by student, selecting or creating entries as required. To process all remaining students in Achievement and Behaviour select “Apply to All” to save the document and create the required database entry in SIMS and apply it to every student in the list at one click of the mouse. It is not practical to use “Apply to All” for Exclusions, Medical Conditions and Medical Events due to the frequent occurrence of overlapping or incompatible entries. You can still use “Auto-Create” and should apply this to each student in turn by selecting “Next”.
To skip a student, select “Skip Student”. To skip all remaining students and go straight to the final screen select “Skip Student” and “Apply to All Students”. This may all seem rather complicated, in reality each step takes seconds. So should you need to save a copy of a letter to thirty student records, you can print an MS Word letter to PDF using File\Print and select the ScanSoft PDF print driver installed with PDF Pro Office. Once in PDF format in Pro Office save the PDF letter to the student records and create the database entry such as an Achievement in SIMS simultaneously for all thirty student records. We estimate this to be a saving of approximately three minutes per student for each multiple save.
|
See RecordLink 4pdf PDF handling is a growing means of working with incoming documentation by scanning the original and handling the scan on the network as a PDF. Under certain conditions a non-compressed scan is perceived legally as an original. For more information search on BIP 0008-2:2005. Whilst Adobe Acrobat Reader is free of charge, to mark up invoices for payment or annotate scanned coursework without altering the original we recommend eCopy PDF Pro Office from Nuance. This gives users easy to use mark-up capability. For example, merging several original documents into one to forward to a Local Authority to notify of an exclusion is a straightforward drag and drop operation. Text such as student names can be blacked out easily and the final electronic document can be emailed to the LA. This replaces the common practice of photocopying originals, using Tippex or markers to obscure unwanted text, photocopying the altered documents and sending the final hard copy to the LA. We also provide identical connectivity between SIMS and eCopy PDF Pro Office with RecordLink 4DPF. Contact us for a trial of these products or search eCopy PDF Pro Office Trial. |
|
Whether you have created your own or been sent or given access to an eXport file the access is the same. With your mouse, right click on the zipped eXport file and select 'Extract All ...'. Change the default criteria if you require and enter the password. The file will be extracted to the chosen location. AT THIS POINT THE EXPORT FILE IS NO LONGER PASSWORD PROTECTED. You must use network or physical security to protect it. The new folder will contain an html file named 'Catalogue' and the same folders as before. The Documents folder contains the actual documents while metadata is held in the Indices folder. To browse the documents by Student name double click on the Catalogue file which will open in your web browser with basic information such as where and when the eXport was created. Follow the link to access the index page. Documents will be listed with metadata (summary, filename etc.) and grouped by student or Staff member. Click on a filename to open a document. Alternatively browse the documents folder which is organised with a named folder per student populated with the exported files with rebuilt and sensible file names. |
When rolling out RecordLink Writer to new SIMS clients you may receive an error loading the library when Word, Outlook or Excel are fired up.
When this is only new installations the likely fault is be the SIMSDotNetDirectory entry in the C:\windows\sims.ini file is missing or incorrect – we've seen it either missing or pointing to Program Files instead of Program Files (x86). RLw uses this to locate the DLLs.
These are document settings applied at the point of saving a linked document in SIMS. They are an additional level of security within SIMS and are applied when using RecordLink Writer.
Public – the document will be available to all users with sufficient add/view/edit document permissions.
Private – the document will be available only to you.
Confidential – the document will be available only to SIMS users with School Administrator or Senior Management Team permissions.
Take three cases :-
Emptiness
A file which is structurally valid as a document but has no contents as a document (e.g. blank Word document). This could only be detected by the appropriate application and RLeX would not detect this. A file which has no length. RLeX does detect and report this.
Validity
All files are valid - the document requires context to detect validity. Again only the appropriate application would detect this.
Extraction errors
If SIMS does not return a file or there is a problem saving the file then we do detect and report this.
It’s worth adding that the RLeX log only reports on the files for which the user has correct permissions and will not report on files omitted by the absence of permission. It’s probably overly MI6 but it means the user cannot use the log to search for hidden documents, albeit in their existence rather than their availability.
This error is a strange one and emerged in January 2017, affecting just two users, both on 64 bit MS Office. It is caused by .Net jitter, differently affecting the same code compiled for the two operating flavours.
The fix
Straightforward. Please contact your LSU and request SIMS Patch 22679 or download the zip file from here.
Capita guidance is here. Please contact your LSU for further support.
The default location is fixed during installation. If you would like to change it uninstall RLex and run the installer again. It takes but a few seconds. You will be given the option to accept the default location as C/My Documents/My RecordLink exports, or you can change it. Which ever you choose, this will be the initial option presented on the final page of the export wizard.
Make sure you have a note of the Product Key. You will need this when you run the installer. Drop us a line if you can't find it.
This bug struck in summer 2017 and does not affect all SIMS clients equally. Upgrade RecordLink writer to V1.7.0.3 or above.
Version 2.2.2 and higher uses ZIP64 to handle exports of more than 4GB or 65,535 entries. These large exports need a ZIP64 utility to extract the archive from the Zip folder. Such utilities have been included in the Microsoft OS since Vista.
The largest archive to be exported, that we know about, was over 9GB. However the theoretical limit of the export is actually around 2˄55 GB!! That means hardware will be the limiting factor well before the utility runs out of capacity.
Smaller exports continue to be handled with the standard Zip utility.
Check for multiple installations of RecordLink Manager and remove the oldest version. While you're there its worth checking the manager is the latest available version, just take a note of the activation and product keys before uninstalling it. You'll need them to activate the licence on the new manager version.
Click here for detailed instructions on installing, activating and renewing RL4pdf.
That's it. 4601.
To scan direct to SIMS from a scanner you'll need eCopy ShareScan installed on the device. If you don't have that then any scanner, copier or MFP that can scan to a network location can still be used to scan to SIMS. From your device, scan your documents to a network folder that can be seen from your PC, then work through the pages. This video tutorial shows you the basics.
This function automatically disassembles a SIMS mail merge document and saves just the relevant sections to the individual student records.
It requires the SIMS Person_id field to be inserted into the mail merge template.
The completed mail merge document is opened in Word and saved to SIMS using the RecordLink writer wizard. The user simply needs to select one tick box to indicate that the document is a mail merge.
This is a simple process. Just add in the SIMS Person_id field into the mail merge template by following three steps.
When designing the report in SIMS, include the Person_id field from the Student Focus when choosing the Data Fields for the report;
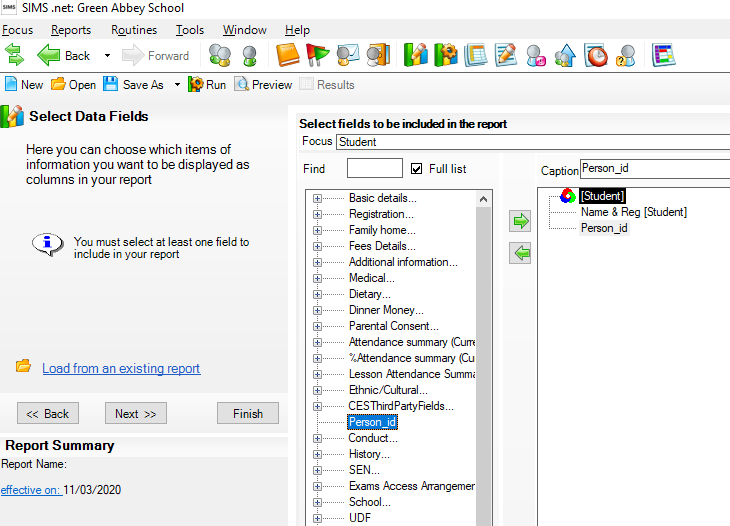
(If you minimise the Basic details tree you will find Person_id to be the fifteenth entry)
Once you reach the stage of designing the Word template, paste (or exactly type in) the text below. Be sure to include the hashes.
##SIMSID:##
This tag can be placed anywhere in the body of the document and depending on your printing arrangements may be changed to white so that it is hidden in the printed copy.
In the Word template, place the cursor between the colon and the next hash and insert the Person_id merge field from the list on the tool bar;
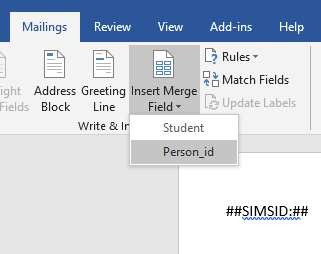
The embedded tag needs to look exactly like this;
##SIMSID:«Person_id»##
The rest of the mail merge process can now be completed as normal.
Once the mail merge document has been produced it can be saved to SIMS in a few steps;
RecordLink
Writer RecordLink
eXport RecordLink
4pdf RecordLink
4ShareScan